Bedding Materials
Dr. Jaiswal explains the importance of “browns” (carbon-rich materials):
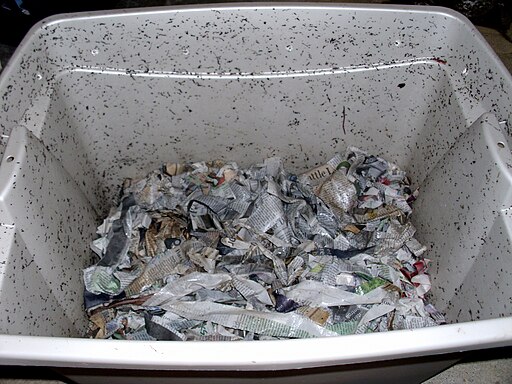
“The browns are these high in carbon materials… these include your paper, you could have leaves… the dry leaves are carbon, and these are good substrates or bases for worms to eat. If you did not have good carbon material, then you would only get water… what you want to do is make sure you have a bed that’s made of carbon.”
Good bedding options include:
- Shredded newspaper (not glossy)
- Cardboard egg cartons
- Paper towels
Preparing the Bedding
The bedding should be moist but not soaking:
“I will moisten the paper… it should not be dripping wet. You don’t want too much water in this system, so it should be moist… because for composting, for that process to happen, moisture is required.”
Choosing the Right Worms
Not all worms are created equal when it comes to composting. Dr. Jaiswal emphasizes:
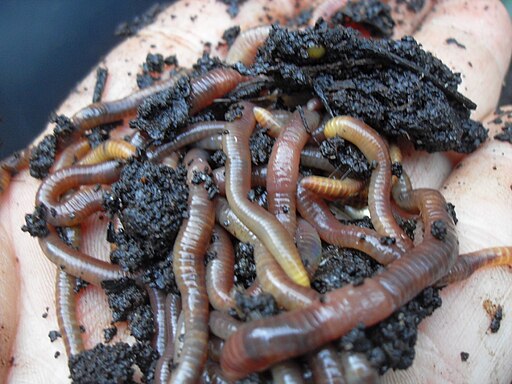
“This is a red worm. It’s not your earthworm. It is not the kind of worms that you find in soil—they are not earthworms, they are red wiggler worms.”
These specialized composting worms can be purchased online:
“You can get it on Amazon. These worms came in a day or two, they were very nicely packed.”
Feeding Your Worms
What to Feed
Your worms will happily process most fruits and vegetables:
“Any kitchen scrap, vegetable or fruit, you can put in there.”
They especially enjoy:
- Fruit and vegetable scraps
- Coffee grounds
- Tea bags
- Eggshells (crushed)
What to Avoid
Dr. Jaiswal advises against adding certain items to your indoor bin:
“I do not put material, especially because this is something that’s inside my house, that smell a lot. So that includes no onions, no garlic… Also, no dairy material, so no cheeses, no yogurt… No oily food, so no fries, nothing that has fried or oil in it.”
Food Preparation Tips
For faster decomposition:
“The trick is the faster decomposition will happen if there’s more area, and one way to make sure that there is more area… is to not put big chunks.”
And to prevent odors:
“Do not leave this exposed. If you’re just putting the scrap and kind of just let it lay there… it will smell. To make sure it does not smell… cover it up with the bedding material so that it’s completely covered.”
Maintaining Your Worm Bin
Temperature Requirements
Keep your worms comfortable:
“This bin and these worms for composting, they need temperatures between 50 degrees to 80 degrees, which is typical for inside the house.”
Rotating Food Placement
To help manage the composting process:
“Keep food on one side one week, then move to the other side the next week. So this side is getting almost like two weeks for the food to get processed.”
Troubleshooting
A healthy bin should have a pleasant earthy smell:
“Right now the compost next to me has a very rich soil smell. It has no other smell, it does not smell of rotten food, and that is always your go-to. If any time your bin is smelling, that means something is not right, the balance is not correct.”
Harvesting Your Compost
How do you know when your compost is ready?
“The compost is ready when sifting of it—it was paper and kitchen scraps, now it’s one homogeneous black material. If I looked at it, it doesn’t… I cannot identify where is paper and where is scrap. So that means that the whole thing is being decomposed, it’s ready.”
The simplest harvesting method:
“Make the… material on the bin on one side… and start putting fresh bedding [on the other side]… Start putting food on this [fresh] side… All the worms will migrate to this side. So the other side, you can just start taking out compost.”
Why Worm Compost is Superior
Dr. Jaiswal highlights the exceptional quality of vermicompost:
“This wormy compost is much higher in nitrogen and richer in organic material than your compost that is generated at the garden or the yard compost bins. So that means a small portion of this compost has more material, more organic material than the one outside.”
The Bigger Picture
Perhaps the most beautiful aspect of vermicomposting is its contribution to sustainability:
“All this thing would have been your waste that would have gone in landfills, and now you have rich organic fertilizer for your soils, for your plants that is actually going back to the cycle and enriching it rather than going into waste.”
Dr. Jaiswal leaves us with this thoughtful perspective:
“We don’t have to have very big solutions for things. We can use what’s in nature… use them as our friends to help us recycle our waste.”
Getting Started Today
Starting your vermicomposting journey is simpler than you might think. All you need is a bin, some bedding, a handful of red wiggler worms, and your kitchen scraps. Before you know it, you’ll be turning waste into garden gold while reducing your environmental footprint.
Contributors